
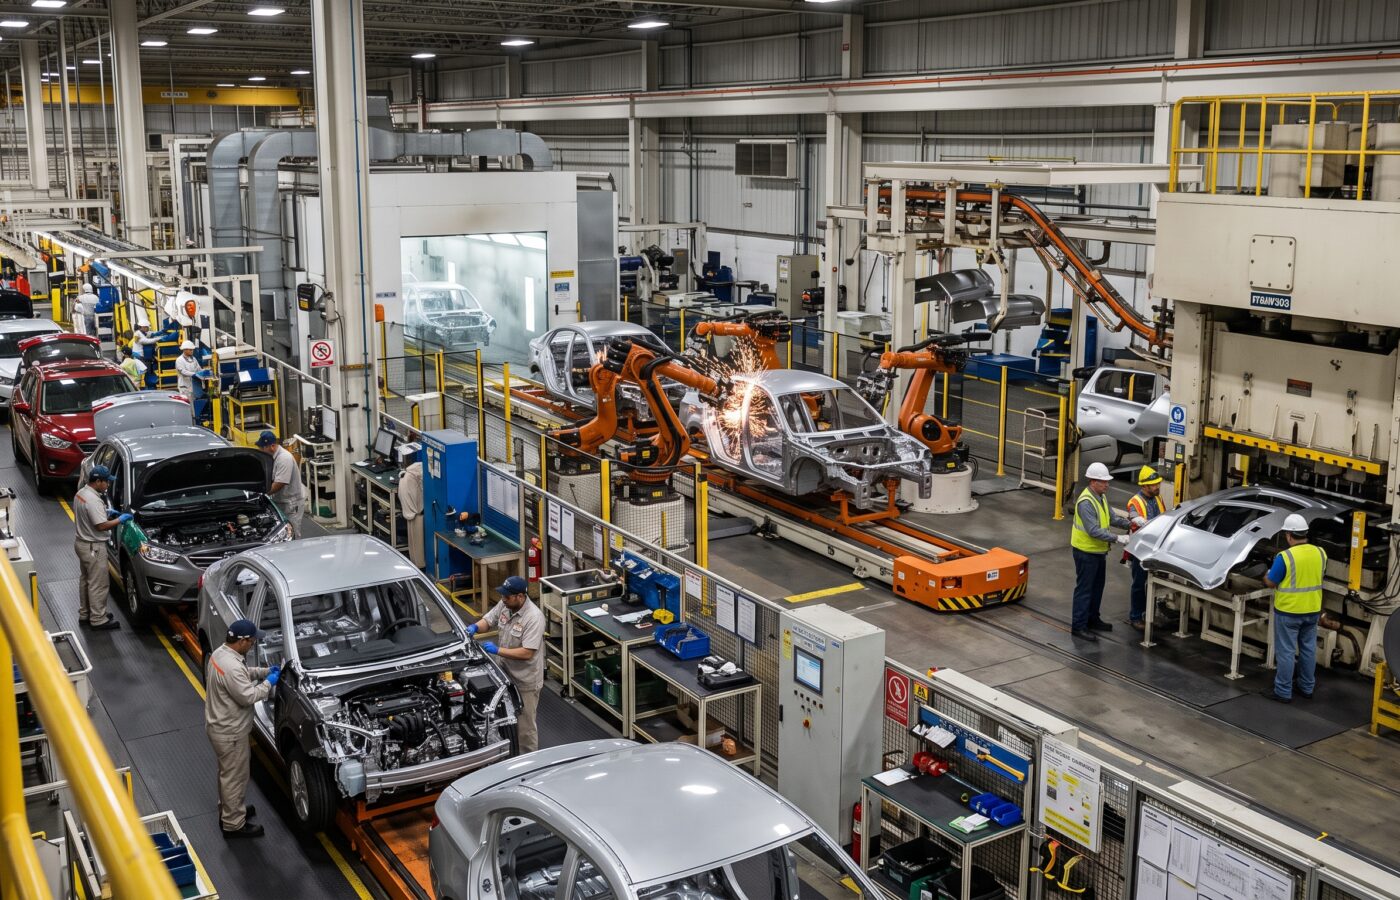
The Automotive Manufacturing Process: From Stamping to Final Assembly

The first time I walked a full vehicle plant as a young engineer, my supervisor gave me one piece of advice. “Follow the steel,” he said. “Everything else will make sense after that.” He was right. At first, a car plant can look like chaos. Robots swing, carriers move overhead, forklifts beep, and hundreds of people work in a rhythm you can’t read yet. However, once you follow one coil of steel to the end, the automotive manufacturing process makes sense.
In truth, it works like a long, disciplined recipe. We call that recipe the automotive manufacturing process. I’ve spent most of my career inside it, mostly in body and assembly engineering. In addition, I’ve spent enough time in the press shop and paint shop to respect both. In this article, I’ll walk you through it the way I’d guide a new engineer in their first week. Specifically, I’ll cover what happens at each stage, why we do it that way, and where things tend to go wrong.
The Four Big Shops
Almost every high volume plant runs the automotive manufacturing process in the same core sequence. First, steel moves through stamping. Then it goes to welding, then to paint, and finally to final assembly. Of course, different companies use different names for these areas. For example, some plants call the body shop “weld” or “metal.” Others call final assembly “trim, chassis and final.” One Japanese automaker’s patent, for instance, describes four processes: body, paint, trim and final.
Why the Order Never Changes
The order stays fixed for a simple reason. Each stage depends on the state the previous stage leaves behind. For example, you can’t weld a panel before you form it. Likewise, you can’t paint a body before you join it, because welding heat and handling would ruin the finish. And you can’t install seats and wiring before the body goes through a paint oven. Therefore, the automotive manufacturing process works as a chain of dependencies. As a result, a problem at any link travels downstream.
So let’s follow the steel.
Stage One: Stamping
Stamping opens the automotive manufacturing process by turning flat sheet metal into shapes you recognize as a car. Doors, hoods, fenders, roof panels, floor pans and dozens of small brackets all start here. For a deeper look at dies and presses, see how the metal stamping process works.
From Coil to Blank to Panel
The raw material usually arrives as large coils of steel or aluminum. First, a blanking line unwinds the coil, straightens it and cuts it into flat pieces we call blanks. Next, a press line forms each blank through a series of dies. The first press usually handles the deep draw, which creates most of the shape. After that, the following presses trim excess material, pierce holes, flange edges and sharpen any soft details.
Many plants run tandem lines. A tandem line places several large presses in a row, with automation moving parts between them. Recently, modern lines have shifted heavily toward servo presses. Servo motors give full programmable control of each press ram at any point in the stroke. In contrast, a traditional mechanical press runs at a fixed speed. That difference matters a lot. With a servo press, you can slow the slide right as the die touches the metal. Consequently, the material gets time to flow, which cuts down on splits and wrinkles. Today’s advanced high strength steels need that control, because they forgive far less than the mild steels we used to form.
Speed Versus Stability
Speed always dominates the press shop conversation. Typically, fully automated tandem lines run around 12 to 15 strokes per minute. Plants that need more usually choose servo presses. Fiat Chrysler’s Warren Stamping plant, for example, offers a good case. Its newer line could run steel panels at up to 18 strokes per minute and aluminum at 15. In some cases, that doubled the speed of the plant’s older lines.
Still, school doesn’t always teach you this. Rated speed doesn’t decide whether a press shop is healthy. Instead, die change time and stability do. A slower line that swaps dies in minutes will beat a fast line that loses an hour every changeover. That’s why some manufacturers now aim for die changes in under five minutes. In fact, when I review a press shop, I check the die change board before I check the stroke rate, because changeover losses do more damage to overall equipment effectiveness than almost anything else.
What Goes Wrong in Stamping
Stamping quality comes down to three things: splits, wrinkles and surface defects. A split happens when the press stretches the metal too far and it tears. Meanwhile, a wrinkle forms when excess material has nowhere to go. Surface defects on outer panels, however, cause the most frustration. A small low spot on a door might hide under press shop lights. After paint, though, under bright inspection lights, it jumps right out. For this reason, inspectors check outer skins in a highlight room or with stoning. In other words, they run a flat abrasive stone across the panel to reveal high or low spots.
Finished parts then go into racks and head to the body shop. Some companies build the stamping plant right next to the assembly plant. Many don’t. In fact, most automakers run fewer stamping plants than assembly plants, so parts often travel a long way. Many smaller stampings also come from outside parts suppliers.
Stage Two: The Body Shop and the Body in White
If stamping makes the shapes, the body shop gives the car its skeleton. At this point in the automotive manufacturing process, hundreds of stamped parts come together into one rigid structure. We call it the body in white.
The name comes from the white primer that manufacturers often applied to the finished shell. Today, however, the term simply means the welded structure before paint, powertrain or interior.
The Most Automated Part of the Plant
The body shop almost always runs with more automation than any other area. Toyota’s plant in France, for instance, offers a striking example. It automates about 98 percent of its body in white line with 600 robots. Moreover, at some stations, up to 12 robots work on the same body at once. Whenever I bring visitors through a body shop, this is usually where they stop talking and just watch.
How the Joining Works
Resistance spot welding handles most of the joining. First, two copper electrodes clamp the overlapping sheets. Then a high current passes through for a fraction of a second. As a result, the resistance heat melts a small nugget of metal, and that nugget fuses the sheets. The whole weld takes roughly 10 to 100 milliseconds. Because the burst is so short, it joins the sheets without overheating the rest of the part.
The numbers per vehicle are huge. Studies put the average at around 3,000 to 5,000 spot welds per car. Furthermore, spot welding accounts for more than 90 percent of the joining work on a typical body.
Spot welding isn’t the only tool anymore, though. Bodies now mix aluminum closures with high strength steel structures. Consequently, body shops also use laser welding, structural adhesives, self piercing rivets, flow drill screws and hemming. Hemming closes up most doors, hoods and liftgates. Essentially, the machine folds the outer skin over the inner panel, often with adhesive between them. You get a clean edge with no visible weld.
Building the Body in Stages
The body shop builds the body in white step by step. First, the underbody comes together: front structure, floor and rear structure. Then the side frames join the underbody at a station we call framing or respot. Above all, this station matters more than any other in the body shop. It sets the geometry of the entire vehicle. If framing drifts by a millimeter or two, every door, hood and fender you hang later will fight you.
After framing, the roof goes on. Next, the line hangs the closures: doors, hood and liftgate or deck lid. We fit closures in the body shop so they travel through paint with the body. That way, the color matches exactly.
Measuring Every Body
Most plants now scan key points on every body with inline optical stations. In addition, they pull a smaller sample for full coordinate measuring machine checks. When I ran body engineering, every morning meeting started with the measurement report. After all, we wanted to catch a drifting trend before it became a gap complaint in final assembly.
Stage Three: The Paint Shop
Most people underestimate the paint shop’s role in the automotive manufacturing process. From the outside, it looks simple. You spray color on a car. In reality, however, it’s one of the most complex and energy hungry areas of the plant. Paint shops take up huge floor space, cost a fortune and demand constant work to control emissions and energy use.
The paint shop has two jobs. The first is corrosion protection, which keeps the body from rusting for its whole life. The second is appearance, which the customer actually sees. Even so, most of the effort goes into the first job.
Pretreatment
The body in white arrives covered in stamping oil, dirt and metal fines. To start, a series of washes and dips clean it. Then the line applies a conversion coating, traditionally zinc phosphate. This step matters more than it looks. In fact, the quality of cleaning and phosphate directly affects corrosion protection and paint adhesion.
Electrocoat: The Coat Nobody Sees
Next comes what I’d call the most important coat on the car. Ironically, the customer never sees it. The line lowers the whole body into a large tank of waterborne coating. An electrical charge then deposits primer onto the metal through cathodic electrodeposition. Because current drives the coating, it reaches box sections, seams and cavities that no spray gun could touch. Besides that, it lays down an even film without sags or runs.
The history here deserves a mention too. Cathodic electrocoat arrived in the 1970s and sharply cut the rust problems that plagued earlier cars. Since the 1990s, nearly every car has relied on it as its base layer of corrosion protection. Afterward, the body passes through an oven that cures the coating.
Sealing, Primer, Basecoat and Clearcoat
Robots and operators then apply sealer to seams and joints to keep out water and dust. Similarly, the underbody gets a tough coating that resists stone chips and road salt.
Then the appearance layers go on. A primer surfacer smooths the surface and adds chip resistance. However, many newer paint shops now combine or skip this step with compact processes. After that, robots apply a base coat for color and a clear coat for gloss and protection. They use rotary bell atomizers, which spin at very high speed. Meanwhile, an electrostatic charge pulls the paint onto the body and keeps waste low.
Inspection and the Real Enemy
Finally, the body passes through a brightly lit inspection tunnel. Trained inspectors and camera systems look for dirt, craters, runs and thin spots. Workers sand and polish small defects. Larger ones, on the other hand, send the body back for repaint.
People always ask me about the hardest part of a paint shop. My answer is dirt. Even a single fiber from a glove can create a visible defect. That’s why paint shops run under positive air pressure and operators wear lint free suits. Likewise, the plant controls entry like a clean room. So when paint quality drops, we check housekeeping first, not the robots.
Between Paint and Assembly: Sequencing and Subassemblies
Simplified diagrams rarely show this part of the automotive manufacturing process. Nevertheless, a lot of real planning happens here.
Balancing the Mix
After paint, bodies don’t always enter final assembly in the order they left paint. Instead, many plants hold them in a painted body storage area and resequence them. The goal is fewer part changeovers and a smooth, balanced mix. For example, you don’t want five sunroof cars in a row. That would overload the sunroof station while the next station sits idle.
Parallel Lines
Meanwhile, subassembly lines run in parallel. A powertrain area marries engines and transmissions. In an electric vehicle plant, by contrast, teams prepare battery packs and drive units. Another line builds the instrument panel as a complete module. That line then delivers each module in the exact sequence the main line needs.
Doors usually come off the body right at the start of final assembly. Then they travel to their own line for glass, speakers, trim and wiring. Near the end, they rejoin the same body. Honestly, keeping the right door with the right body used to keep me up at night early in my career.
Stage Four: Final Assembly
Final assembly closes out the automotive manufacturing process by turning a painted shell into a car. It also needs more people than any other area, because much of the work still needs human hands, eyes and judgment. Toyota’s French plant, for instance, shows the scale well. The car arrives as an empty shell. By the end, it leaves with wiring, hoses, brakes, engine, windows, bumpers, wheels, seats and a steering wheel. Notably, that line uses 1,450 screwdrivers to drive 1.4 million screws every day.
Final assembly usually splits into three zones.
Trim
Trim comes first, while the body is still open and easy to reach. Here, operators install the wiring harness, sound deadening, carpets, headliner, instrument panel and interior trim. Wiring ranks among the trickiest jobs on the line. After all, a modern harness carries thousands of circuits. One half seated connector can cause a fault that only shows up on a test stand, or worse, in a customer’s driveway.
Chassis and the Marriage
Next comes the marriage, when the body meets the powertrain and suspension. In a traditional plant, a carrier lifts the engine, transmission, axles and exhaust from below. At the same time, the body comes down from above. In an EV plant, however, the line usually raises the battery pack and bolts it into the floor. For these reasons, engineers design the marriage station with extreme care. Two very large, heavy assemblies must meet within tight tolerances, dozens of times an hour.
Final
In the last zone, the car gets its seats, wheels, fluids, bumpers and its original doors. Some plants also install glass here. Before adding brake fluid and coolant, fill machines pull a vacuum, so no air pockets remain. Then, for the first time, the car starts on its own power.
Takt Time
Takt time makes final assembly work. Simply put, it sets the pace the line must hold to meet customer demand. For example, if takt is 60 seconds, every station gets 60 seconds, no more. A big part of my job involved balancing work so no station ran overloaded and no operator stood idle. It sounds simple on paper. On the floor, however, with dozens of model and option combinations, you never fully finish solving that puzzle.
Quality and End of Line Testing
Testing forms the last gate in the automotive manufacturing process. Every vehicle faces a battery of tests before it leaves. Most plants I’ve worked in follow a sequence like this:
- Wheel alignment and headlamp aim on dedicated machines.
- Roll and brake testing, where a driver runs the car on rollers to check drivetrain, brakes and speed readings.
- Electrical and software checks, where technicians flash every control module and scan for fault codes.
- Water test, a high pressure shower booth that finds leaks around doors, glass and seals.
- Squeak and rattle testing, often on a short track with rough surfaces.
- Final visual audit under bright lights, covering paint, fit and finish.
On top of that, auditors pull a small sample of cars every day. They tear into each one far more deeply than the line ever could. Then their findings go straight back to every shop. For example, a wind noise issue might trace back to a hemming problem in the body shop. It might even trace back to a worn die in stamping. In short, every stage links to every other.
The System Holding It All Together
You can’t talk honestly about the automotive manufacturing process without the production system behind it. Most modern plants, whatever brand sits on the sign, run on lean principles that trace back to Toyota.
Jidoka and the Andon Cord
The Toyota Production System rests on two pillars: jidoka and Just in Time. Jidoka gives operators the right and duty to stop the line. At Toyota, for example, any team member can pull the andon at any step. That stops production and keeps a problem from reaching the next person. The idea actually goes back to the early 1900s. Back then, Sakichi Toyoda invented a loom that stopped itself whenever a thread broke. Before that, looms kept producing piles of defective fabric.
Just in Time and Kanban
Just in Time means making only what you need, when you need it, in the amount you need. As a result, it keeps the line fed without huge stockpiles. Kanban sits at its center, signaling when to refill parts at the line. Add sequenced deliveries from suppliers, and one line can build dozens of trim and color combinations back to back.
I’ll be honest. When I started, the andon cord felt strange. After all, why would anyone stop a line that costs thousands of dollars a minute? It took me years to understand. Ultimately, a 30 second stop to fix a problem at the source costs far less than finding it on 400 cars at shift end. That habit of fixing problems where they start sits at the heart of the best kaizen examples.
Where the Process Is Heading
The basic automotive manufacturing process of stamp, weld, paint and assemble hasn’t changed in decades. Moreover, I don’t expect it to disappear soon. Still, the details are shifting fast.
Electric vehicles simplify the powertrain side of final assembly. At the same time, they add new complexity around battery handling, high voltage safety and software. Additionally, some carmakers now use large castings in place of dozens of stamped and welded parts. That shifts work between the press shop and the body shop. Similarly, paint shops keep shrinking their footprint and energy use with compact processes and lower cure temperatures. And data now flows from everywhere. Weld controllers, torque tools and measurement systems all report in real time, which also helps plants reduce downtime. Consequently, we can spot a trend on a screen long before a customer ever sees a defect.
What hasn’t changed, however, is the discipline. Every stage still depends on the one before it. Likewise, every shortcut still shows up somewhere downstream.
Final Thoughts
If you take one thing from this article, remember my first supervisor’s advice: follow the steel. From outside, the automotive manufacturing process looks overwhelming. In reality, though, it runs as a sequence of well understood steps, each one setting up the next. First, stamping shapes the parts. Then the body shop gives the car its structure. Next, the paint shop protects it and makes it beautiful. Finally, final assembly brings it to life. Above all, a production system built around quality at the source keeps everyone honest.
Even after all these years, I still stop and watch when a finished car rolls off the line and starts for the first time. A lot of engineering lives in that moment, and a lot of people made it happen.
Frequently Asked Questions
What are the main stages of the automotive manufacturing process?
The four core stages are stamping, body welding, painting and final assembly. After that, end of line testing and quality audits follow. Learn more from ASSEMBLY Magazine.
What does “body in white” mean?
It’s the welded metal body of the vehicle before paint, powertrain or interior. The name comes from the white primer manufacturers traditionally used on the shell. See the Rustproofing overview on Wikipedia for how plants protect that body.
How many welds are in a typical car?
Most passenger car bodies carry several thousand spot welds, usually 3,000 to 5,000, depending on model and materials. See ScienceDirect’s resistance spot welding overview.
Why is electrocoat so important in car painting?
Electrocoat uses electric current to deposit primer on every surface, including hidden cavities. As a result, it gives the car its core corrosion protection. See UL Prospector on cathodic electrocoating.
How long does it take to build a car?
On a high volume line, the automotive manufacturing process typically takes around 18 to 35 hours per vehicle. However, the exact time varies widely by plant, model and buffer size.
What is the andon system in car manufacturing?
Andon lets any operator flag a problem or stop the line, so the team can fix it at the source. See Toyota Global.
References
- ASSEMBLY Magazine. Automotive Stamping Line Is Fast and Flexible.
- Komatsu Press. Verifying World Class Stamping at Fiat Chrysler.
- Automotive Manufacturing Solutions. New Stamping Ground with the Latest Technologies.
- SEYI. Tandem Press Line.
- ScienceDirect Topics. Resistance Spot Welding: An Overview.
- ScienceDirect. Failure Behaviour of Spot Welds on Automotive Steel Sheets.
- Wikipedia. Rustproofing.
- UL Prospector. Cathodic Electrocoat: Priming the Way to Unsurpassed Product Finishing Performance.
- Engineering Cheat Sheet. Automotive Assembly Line: The Car Assembly Process.
- Toyota Motor Corporation. Toyota Production System.
- Toyota Europe. Toyota Production System.
- Lean Enterprise Institute. Jidoka.