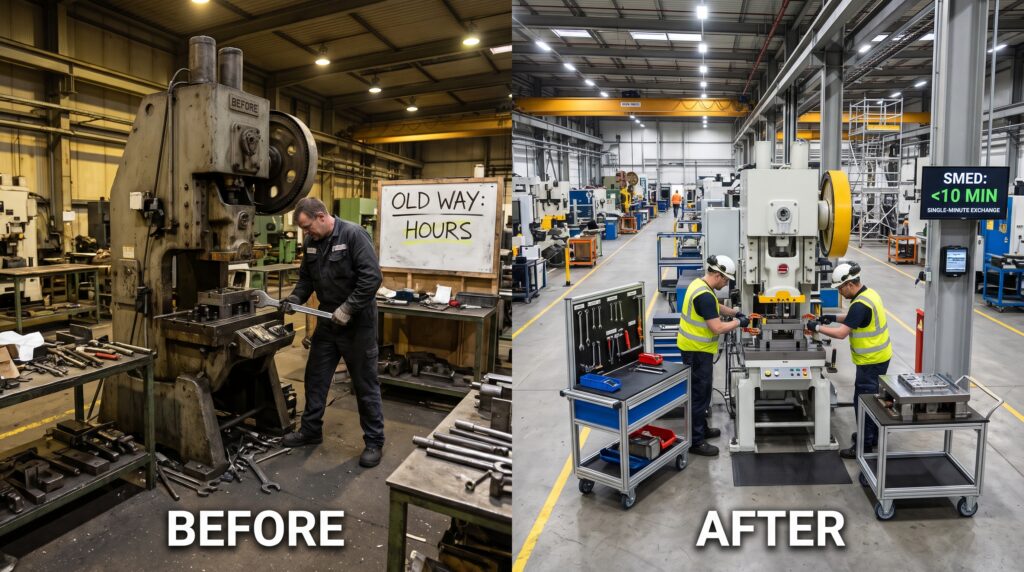
SMED reduces machine changeover time by streamlining setup activities, organizing tools, and improving manufacturing efficiency.
The first SMED event I ever ran was on a 400 ton stamping press, and to be honest, I did it badly.
I came in with a stopwatch, a clipboard, and a lot of confidence from a training course I’d just finished. The crew had been changing dies on that press for years. Their average was a little over two hours, and they were proud of it, because it used to be closer to four. First, I watched one changeover and wrote down maybe a dozen steps. Then I stood in front of the team and told them we could get it under ten minutes.
You can guess how that went. The setup lead, a man who had probably changed more dies than I’d had hot dinners, folded his arms and asked me where I planned to find the forklift that was always parked at the other end of the building. Of course, I didn’t have an answer. In fact, I didn’t even know there was a forklift problem.
What That First Press Taught Me About SMED
That press did eventually get under fifteen minutes. However, it took us about eight months, and almost none of the improvement came from me. Instead, it came from the people who did the work, once I learned to shut up, watch properly, and ask better questions.
For that reason, this isn’t a textbook summary. It’s what I’ve learned about SMED from running it on presses, injection molders, packaging lines, CNC cells, and one memorably stubborn label printer. So if your changeovers are eating your shifts alive, this is how you get that time back.
What SMED Actually Means
SMED stands for Single Minute Exchange of Die. Because the name trips people up, let’s clear that up first. “Single minute” doesn’t mean one minute. Instead, it means single digit minutes. The Lean Enterprise Institute defines it as a process for changing over production equipment from one part number to another in as little time as possible, with the target of getting changeover times to a single digit, or less than 10 minutes.
Where SMED Came From
The method is credited to Shigeo Shingo, the Japanese industrial engineer whose work became a cornerstone of the Toyota Production System. Shingo’s insight was almost embarrassingly simple, which is probably why it took so long for most of the world to take it seriously. Specifically, he noticed that a huge share of the work done during a changeover didn’t actually need the machine to be stopped. Instead, people were stopping the machine and then going to look for tools, bolts, the next die, the paperwork, and the person who knew the settings.
In other words, every changeover is made up of individual tasks, and each task is either something you must do with the machine stopped, or something you could do while it’s still running.
Internal and External Elements in SMED
Shingo called these internal and external elements.
Internal elements must happen while the equipment is stopped. For example, unclamping the old die, lifting it out, and setting the new one in place.
External elements, on the other hand, can happen while the equipment is still making good product. For instance, fetching the next die, staging the bolts, preheating a mold, printing the job sheet, and checking that the right material is at the line.
As a result, the whole SMED system comes down to doing three things in order: first, separate the external work from the internal work; second, convert as much internal work as possible into external work; and finally, streamline everything that’s left.
That’s it. In fact, the difficulty isn’t in understanding it. Rather, the difficulty is in doing it honestly, on a real floor, with real people who have good reasons to be skeptical.
Why SMED and Changeover Time Matter More Than You Think
Most plant managers I meet already know their changeovers are slow. However, what they often haven’t done is connect that fact to the bigger problems keeping them up at night.
Long Changeovers Force Big Batches
Long changeovers push you toward big batches. After all, if it takes three hours to switch a line, nobody wants to switch it twice a day, so you run a week’s worth of one part and then a week’s worth of the next. That feels efficient on a spreadsheet. On the floor, however, it means mountains of inventory, warehouse space you’re paying for, parts that sit long enough to get damaged or go obsolete, and customers who have to wait because the thing they need is three products down the schedule.
When changeovers drop to minutes, by contrast, the economics flip. As a result, you can run smaller lots, respond to actual demand, and stop building stuff nobody ordered yet. Similarly, academic research on setup reduction makes the same point: cutting setup time minimizes nonproductive periods on the shop floor, and that in turn enables production of increasingly smaller lot sizes.
The Payoffs That Don’t Show Up on a Spreadsheet
In addition, there are other payoffs that don’t show up as cleanly in the numbers but matter just as much:
- Capacity you already own. Every hour you take out of changeovers is an hour of production capacity you didn’t have to buy a new machine to get.
- Better first part quality. A standardized changeover means fewer adjustments, fewer trial shots, and therefore less scrap while you “dial it in.”
- Less stress for the setup crew. A chaotic changeover is exhausting. In contrast, a well organized one is just a job.
- Real scheduling flexibility. When a rush order comes in, you can actually say yes.
For example, I’ve seen a plant avoid a planned capital purchase of a second molding machine purely because SMED gave back enough hours on the existing one. Needless to say, the CFO became my biggest fan that quarter.
How to Measure Changeover Time Before Starting SMED
Before you change anything, you need a baseline you can trust. Unfortunately, this is where a lot of SMED projects quietly go wrong, because people measure the wrong thing.
The definition I use, and the one I push every team to adopt, is the one popularized by Vorne: changeover time runs from the last good part of the previous job at normal production speed to the first good part of the next job at normal production speed.
Don’t Ignore the Ramp Up
Notice what that includes. It’s not “from when we stopped the press to when we started it again.” Instead, it includes the slowdown at the end of the old run, all the stopped time, and the whole ramp up period where you’re making scrap, adjusting, checking, and creeping back up to full speed. On a lot of machines, in fact, that ramp up is where the real time hides. For instance, I’ve watched lines where the “official” changeover was 40 minutes but the true clock, last good part to first good part, was well over two hours.
Consequently, if you measure the short version, you’ll fix the short version and wonder why output didn’t improve.
Watch Out for the Hawthorne Effect
A practical warning here. When people know they’re being watched, they speed up. Vorne’s guidance flags the Hawthorne Effect directly: changeover times may temporarily improve simply because the process is being observed, so where possible use prior data to baseline the changeover time. Therefore, pull a few weeks of history from your production logs if you have them. If you don’t, then observe several changeovers, not just one.
The SMED Process, Step by Step
Different sources break SMED into three, four, five, or seven steps depending on how granular they want to be. Still, don’t get hung up on the count, because the logic is the same. Here’s the sequence I actually use with teams.
Step 1: Pick the Right SMED Pilot
Don’t start with your most complicated machine. Likewise, don’t start with every machine. Instead, pick one piece of equipment that matters (it’s a bottleneck, or it changes over often) and where the team is reasonably open to trying something new.
A quick win builds belief. Meanwhile, a failed first attempt on the hardest machine in the building builds a story that “SMED doesn’t work here,” and that story will follow you for years.
Step 2: Film It and Write Down Everything
I stopped relying on a stopwatch and clipboard a long time ago. These days, I film the whole changeover, start to finish, ideally with two cameras: one on the machine and one following the setup operator. A phone on a tripod is fine.
Then the team sits down together and goes through the footage. Every single action becomes a line on a list, with a description and how long it took. A typical changeover averages 30 to 50 individual elements, and in my experience the first pass always undercounts. For example, the team will swear there are fifteen steps, but the video will show forty.
Capture what the people are doing and also what the machine is doing. Walking counts. Waiting counts. Above all, searching for a wrench absolutely counts. Write it all down without judgment, because this isn’t about blame. Rather, it’s about seeing the process as it really is.
That first video session is usually the most valuable hour of the entire project. Typically, people see themselves walking back and forth to the tool crib four times and start laughing. Once they’re laughing, they’re in.
Step 3: Separate Internal From External SMED Elements
Next, go down the list, element by element, and ask one question: does the machine actually have to be stopped to do this?
If the answer is no, mark it external and move it either before the changeover starts or after the new job is running. As a result, the list ends up in three groups: external work before the changeover, internal work during it, and external work after it.
This step alone typically cuts changeover time dramatically, and what’s more, it costs almost nothing. After all, you’re not buying anything or modifying the machine. You’re simply doing the prep while the old job is still running instead of after it stops.
On that stamping press I mentioned, for instance, simply staging the next die, the clamps, the bolts, and the forklift (yes, that forklift) before shutdown took nearly 50 minutes out of the changeover. Yet we didn’t touch a single piece of hardware.
The best tool for making this stick is a changeover checklist: a short list of everything that must be ready at the machine before the stop happens. That means the right die, right bolts, right tools, right material, right program, and right paperwork. If it isn’t all there, then the old job keeps running until it is.
Step 4: Convert Internal SMED Work Into External Work
This is where SMED gets creative. Look at every internal element left on the list and ask: if we absolutely had to do this while the machine was running, how would we do it?
Here are some of the techniques I lean on most:
- Advance preparation. Preheat molds or dies before they go into the machine instead of heating them in place. On plastic injection molding, for example, this one change alone can save a big chunk of startup time.
- Standardize the interface. If every die has a different height, then every changeover means shimming and adjusting. Therefore, standardize the clamping height, the locating points, and the connection fittings so dies drop in the same way every time.
- Intermediate jigs or subplates. Mount the tooling onto a standard plate offline, set and align it there, and then swap the whole plate into the machine. That way, the fiddly alignment work happens while the machine is still running.
- Preset tools and settings. Measure tool lengths offline. Similarly, store and recall recipes rather than typing them in from memory. Finally, mark fixture positions so nobody has to “find” them.
Once this step is done, you should have fewer internal elements and more external ones. After all, that’s the whole point.
Step 5: Streamline Everything That’s Left
Now you work on the remaining internal tasks, and then the external ones, making each one faster and simpler. Always prioritize internal work first, because that’s what’s costing you machine time. External work matters too, but only after the stopped time is under control.
Common streamlining moves include:
- Eliminate adjustments. In my experience, adjustments and trial runs are often the single biggest chunk of a changeover. Indeed, every “tweak it and try again” loop is a sign the setup isn’t repeatable. Locating pins, fixed stops, and gauge blocks, however, remove the guesswork.
- Replace bolts with quick release fasteners. If a bolt needs ten turns to loosen but only the last turn actually holds anything, then you’re wasting nine turns. By comparison, quarter turn fasteners, cam clamps, pear shaped bolt holes, and toggle clamps are cheap and fast.
- Run tasks in parallel. Two people working from a clear procedure, one on each side of the machine, can often halve the internal time. The key word, however, is procedure. Without it, two people just get in each other’s way.
Step 6: Organize the Workspace and Mechanize Last
In addition, two more moves round out the streamlining work:
- Kill the walking. Use shadow boards, mobile changeover carts, and point of use storage so everything is within arm’s reach. In this sense, good 5S practice is the foundation that makes SMED stick.
- Mechanize where it truly pays. Die carts, rollers, and hydraulic clamps can help, but they come last, after the cheap stuff. For example, I’ve watched plants spend serious money on automated clamping systems before they’d even fixed their staging. Don’t be that plant.
Step 7: Standardize Your SMED Changeover, Train, and Repeat
A new changeover method that lives in one operator’s head isn’t a standard. So document it. Make a one page visual procedure with photos. Then put the checklist on the cart. Above all, train every shift, not just the day shift that was part of the event.
After that, measure again. And again. Also, post the changeover times on a board at the machine. Ultimately, the teams that keep improving are the ones that can see their numbers and own them.
Finally, when you’ve got that machine where you want it, go back to Step 1 and do it again. SMED isn’t a one time project. On the contrary, each round will find more to remove.
A Realistic Picture of SMED Results
People love the dramatic numbers, such as a changeover that went from four hours to eight minutes. I’ve seen those, and they’re real. Even so, I want to give you a more honest picture of what a typical journey looks like, because setting expectations is part of the job.
Round One: Separation
In my experience, the first round on a machine that’s never had SMED attention usually takes out somewhere between a third and half of the changeover time, mostly from separating external work. Moreover, that happens fast, often within a week.
Round Two: Conversion
The second round, converting internal to external, takes longer and sometimes needs some modest spending on fixtures, carts, or standardized plates. Even so, another solid chunk comes out.
Round Three: Streamlining
The third phase, streamlining and eliminating adjustments, is the slowest and most technical. This is where engineering and maintenance get pulled in, and consequently where you start getting into single digit minutes.
What I tell plant managers is this: don’t promise ten minutes on day one. Instead, promise a 50 percent cut in the first month and continuous improvement after that. That way, you’ll usually beat it, and you’ll keep your credibility.
Where SMED Projects Go Wrong
I’ve been around long enough to watch plenty of SMED efforts fall apart. In almost every case, it’s for one of the same few reasons.
The Consultant Does the SMED Work Instead of the Team
This was my mistake on that first press. The people who change over the equipment know where every problem lives. Therefore, your job as a CI manager or consultant is to give them structure, time, and permission. Otherwise, if they don’t own the new method, it’ll drift back to the old one the week after you leave.
Nobody Touches the Ramp Up
Teams cut the stopped time beautifully and then lose it all in two hours of startup scrap. If you measured from last good part to first good part, you’ll catch this. If you didn’t, however, you won’t.
Spending Money on SMED Too Early
The most effective SMED work is cheap: staging, checklists, carts, quick fasteners, and standardized heights. For this reason, buy hardware only after the free improvements are in place. Otherwise, you automate a messy process and lock the mess in.
Treating It as a One Off Event
A kaizen week gets everyone excited, and then everyone goes back to their day jobs. As a result, without a follow through plan, a standard, and regular audits, times creep back up within months.
Using the Saved Time to Run Even Bigger Batches
This one hurts. A plant cuts its changeover in half and then uses the freed capacity to run longer lots, simply because that’s what the scheduling system has always done. Yet the whole point of SMED is to change over more often, in smaller lots, closer to real demand. In short, if your scheduling logic doesn’t change, you’ve only captured part of the benefit.
SMED Beyond the Press Shop
Although Shingo developed SMED for die changes on stamping presses, the method works anywhere you switch a process from one product or job to another.
For example, I’ve applied it on packaging lines (format changes and label swaps), CNC machining cells (fixture swaps and tool setup), injection molding (mold changes and material purges), food and beverage lines (cleaning and allergen changeovers, where the cleaning itself becomes the internal work to attack), and printing (plate and ink changes).
Furthermore, the principle holds outside manufacturing, too. Here’s one of my favorite examples. The journey from a 15 minute tire change to a 15 second tire change can be considered a SMED journey. In fact, a racing pit crew is basically a perfect SMED team. Everything external is ready before the car arrives. Meanwhile, everything internal is done in parallel, by people with clearly defined roles, using tools designed to remove every wasted motion. So think about that the next time someone tells you their changeover “just takes as long as it takes.”
Getting the People Side of SMED Right
Finally, I’ll end the method section where I should have started on that first press: with the people.
SMED changes how setup crews work, and sometimes it threatens how they see their own value. For instance, a setup tech who has spent twenty years being the only person who can get a tricky die running might quietly worry that standardizing the process makes him less important. That worry is reasonable, and therefore you need to address it directly.
Put Your Experienced People at the Center
What I’ve found works is putting those experienced people at the center of the improvement. First, they lead the video review. Then they decide which ideas get tested. Finally, their name goes on the new standard. In other words, their expertise doesn’t disappear. Instead, it gets written down and shared, and they become the people who train everyone else.
Also, make it clear that faster changeovers are not about cutting headcount. After all, if people suspect SMED is a setup for layoffs, they’ll protect the old way of working, and they’ll be right to.
Celebrate the Wins
Above all, celebrate the wins publicly. For example, when that stamping press finally broke the fifteen minute mark, we put the crew’s photo up in the cafeteria next to the new changeover time. The setup lead who’d folded his arms at me on day one stood next to that photo for a good while. Without a doubt, he’d earned it.
Final Thoughts on SMED
SMED isn’t complicated. First, separate what can be done while the machine is running. Next, convert as much stopped work as you can into running work. Then streamline the rest. Finally, standardize it, train it, measure it, and do it again.
What makes it hard, however, is that it asks you to look at a process everyone thinks they know and admit it’s full of waiting, walking, and searching. Once a team sees that clearly, usually on video, the ideas come fast.
In the end, if your changeovers are measured in hours, you are almost certainly sitting on capacity you’ve already paid for. SMED is how you get it back.
Frequently Asked Questions About SMED
What does SMED stand for?
SMED stands for Single Minute Exchange of Die. However, “single minute” means single digit minutes, so the goal is a changeover under ten minutes, not under one minute. The Lean Enterprise Institute lexicon entry on SMED gives the standard definition.
Who invented SMED?
SMED is credited to Shigeo Shingo, a Japanese industrial engineer closely associated with the Toyota Production System. In addition, you can read more about its history in the Wikipedia overview of Single Minute Exchange of Die.
What is the difference between internal and external setup in SMED?
Internal setup must happen while the machine is stopped, such as removing and mounting a die. External setup, by contrast, can happen while the machine is still running, such as staging tools and preheating molds. The Lean Production guide to SMED explains both with examples.
How do you measure changeover time for SMED?
Measure from the last good part of the previous job at normal speed to the first good part of the next job at normal speed. That way, the ramp up and scrap period counts. Reliable Plant’s SMED article also covers this baseline approach.
How long does a SMED project take?
A first pass on one machine often shows big results within a week, mostly from separating external work. However, getting to single digit minutes usually takes several improvement rounds over a few months.
Does SMED only work in manufacturing?
No. Although it started with stamping presses, it applies to packaging, molding, machining, food lines, printing, and even service processes. In short, any time work stops to switch from one job to another, SMED applies. MaintainX’s SMED guide shows how it fits into broader maintenance and continuous improvement work.
What is OTED and how does it relate to SMED?
OTED means One Touch Exchange of Die, a more ambitious goal of getting changeovers under 100 seconds. Because it builds on SMED, it usually requires more engineering and hardware investment.
Is SMED the same as kaizen?
Not exactly. SMED is a specific method for reducing changeover time. Even so, it’s often run as a kaizen event and reflects the kaizen philosophy of continuous, incremental improvement. 6Sigma.us’s SMED overview explains how SMED fits within Lean Six Sigma.
References
- Single Minute Exchange of Die, Lean Enterprise Institute Lexicon
- SMED (Single Minute Exchange of Die), Lean Production by Vorne
- SMED: What It Is and Why It Matters, Reliable Plant
- Understanding SMED: A Guide to Efficient Lean Manufacturing, MaintainX
- Single Minute Exchange of Die: A Lean Tool for Rapid Equipment Changeovers, 6Sigma.us
- Single Minute Exchange of Die, Wikipedia
- SMED and Alternative Setup Reduction Methodologies, Gestão & Produção (SciELO)
- NADCA Guide to Quick Die Changes, Foundry Management & Technology